Better than original?
It’s not too often that an improvised repair job can produce something better than the original but in the case of yesterday’s pump repair, I think we accomplished just that.
The other day we noticed that our shower sump pump, the unit that will take any water which has accumulated on our head’s floor and get rid of it overboard, was no longer working. Although it would turn on and make some noise when the switch was thrown, no water would be evacuated when it ran. Fortunately, this pump was not hidden in some inaccessible place. Instead, I had direct access to it in our forward locker, although I did have to hang upside-down a bit to get my hands on it.
Although my initial guess was that the joker valve or one of the seals had failed, once the pump was removed it didn’t take a rocket scientist, or in this case a pump scientist, to figure out why it wasn’t working. We could easily see that a plastic fitting which was supposed to hold the unit together had snapped, no doubt a victim of the harsh marine environment and vibration. Unfortunately, this crucial piece would almost certainly not be sold individually, at least not down here that is. And purchasing another pump, which I found were selling for $250.00 US, was out of the question.
After throwing several ideas around, I opted to follow our friend Kirk’s suggestion (it pays to have smart friends) and use one of his extra-large hose clamps (and it really pays to have friends who have lots of fix-it stuff on their boat) to support the fitting which had parted. To get a clamp that was just the right size, we actually had to mix and match a bit, connecting two separate stainless steel clamps of different circumference together. And in order to get it to fit just right, I used our Dremel tool to cut off the little extrusions on the plastic fitting. Once the dual hose clamp was tightly secured on top of the original fitting, and covered in rigging tape to ensure that it would not slip off, we had something even stronger than the original construction.
Of course, the final test was to see if it would pump water. I first checked this by connecting some 12-volt test leads to the pump while still inside the boat and satisfied that it was functioning as it should, I repeated the hang-upside-down-in-the-locker process which was required to reinstall it.
End result: It took a couple of hours of thinking and work plus about $10 bucks in misc. parts to get the $250.00 pump back on the job. Not a bad afternoon’s work.

Ready to begin repair process.

The culprit.

Dual stainless-steel hose clamps securing the pump.
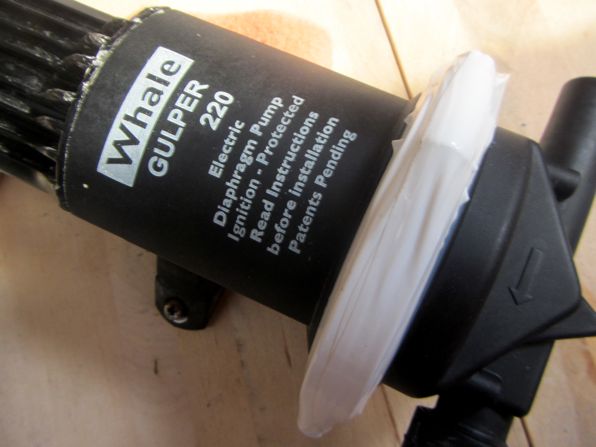
The belt and suspenders approach… a bit of rigging tape, just in case.
What do you mean by ‘rigging tape’ please? It looks like plumbers ptfe tape in the picture.
That’s a nice fix. Are those rust-proof stainless clips, or just basic stainless?
Mike
Rigging tape = white vinyl tape.
I have yet to see a rust-PROOF clamp. They are stain-LESS, of what grade, I am unsure.
Thanks, I call it insulation tape, probably a generation thing!
Genuine ‘rust free’ stainless is expensive, therefore rare. I use the same as you and lubricate liberally.
Mike
I agree, it definitely looks stronger than original.
And don’t worry, you’ll collect tons of fix it stuff too as the years roll by.
We’ll need a bigger boat to hold it all!
Your the one who keeps mentioning that bigger boat…
I know.
Nice fix Mike, I agree definately looks stronger than original should last forever now.
Let’s hope! If I do need to change any of the seals in it the pump can still easily be disassembled.
Oh Yeah? Well I had to replace the drains in my tubs. err heads. They were so corroded that there was nothing to grab in order to unscrew them. So ,I had to make a wedge out ot a 2×4 piece. pounded it in and turn it until it sowly gave up the ghost. Then, to top it off, at Home Depot, I found replacement tub drains in the parts aisle for $25 individually packaged. However, over in the installation aisle I found a contractor pack that had the part I needed plus other elbows and such for $15.00.
Moral of the story, Plumbing sucks, and always search for a deal !
And I had a congratulatory beer in paradise too, @home where the heart is.
Nice! Be thankful you still have access to Home Depot.
Nicely done! It definitely pays to have friends around with lots of spare parts….especially when you are missing that ONE item in your spares box. We enjoy these posts that show the other side of cruising – not just swimming in waterfalls, but fixing things that break with what you have on the boat!
Katie and Mark
I prefer waterfalls. 🙂
In fact, we’re going to go find another one in a couple of days.
Nice work . . . a classic ZTC solution!
I notice in the background of the first photo there’s some plywood that appears to be suffering water damage. If that’s an easily removable piece of ply I’d recommend doing so and then soaking the end grain in epoxy.
The boat builders should have done this originally but I guess they figure that by the time the wood begins to show rot tendencies they’ll no longer have responsibility. This shortcut lowers their production costs and makes them more competitive.
I’d read somewhere that PDQ’s were generally regarded as being a ‘step above’ some of the typical builder methods (i.e. – they’d not leave any unfinished glass showing inside cabinets, double clamp hoses, etc.), but having raw wood edges in a wet environment wasn’t a good idea.
Refinishing that piece wood is on this season’s to-do list.
Should you ever want a metal solution–what it should have been–I’m willing to bet the part is available somewhere in SS. We see many similar clamps in industrial equipment. It’s not the design, it’s the material.
http://www.mcmaster.com/#catalog/118/396/=ipvdyz
Perhaps with the dimension in hand and strong Google fu you can find what you need. But I do like your battlefield solution. Should last.
Yes, my friend Kirk also thought that a similar clamp manufactured for other applications could be found.
Mike,
You need to get some of this tape on your boat. It would work much better than the rigging tape.
Deb
S/V Kintala
http://www.theretirementproject.blogspot.com
We do have some but as the tape in this project was really only added to stop the clamp from slipping (a very slim chance), I felt the stuff I used was sufficient. The Rescue Tape was not quite so easily accessible as it is stored with our plumbing stuff.
Mike,
When next in civilization; the “correct fix” is a stainless steel v band clamp. Choose brand and grade of stainless accordingly.
Sean
PS I am still catching up to current time so you probably won’t see this, but nobody said it and I felt compelled.
Thanks, Sean. I do always see the comments as they are posted but I had to go to the post to see what you were referencing. 🙂