Taking advantage of our time on the dock
When your boat only has one engine and you take it apart, you’re pretty much committed if you want to move it again. We were in that position when we decided to tackle our Perkins engine’s oil leak ourselves. Especially considering that it was carnival time, and NO ONE works during carnival!
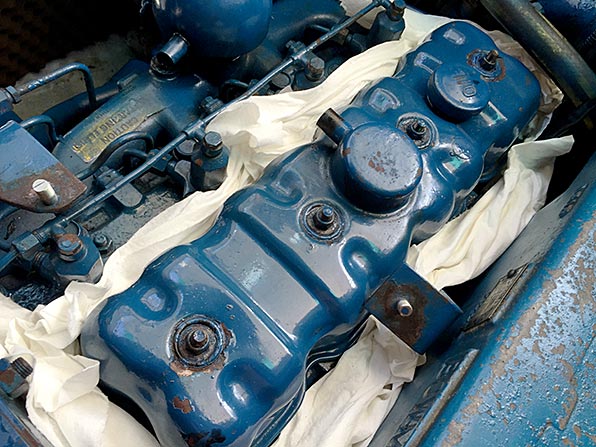
As many people commented, both on our blog and on our Facebook Page, the job of replacing the valve cover’s gasket wasn’t super tough or complicated. After draining the oil from the engine (I had planned to change the oil and filter anyway), I removed the valve cover carefully, trying to contain the spillage of the oil left inside. The gasket came off pretty easily and after inspecting it, noted a split in it, and an area which looked to be folded over. Was it like that all along or did the damage occur when I removed it? I don’t know. I had a new gasket on hand so I wasn’t concerned with trying to preserve it.

I methodically cleaned the valve cover, and the area that it mates to. Again, I was being careful, this time preventing any bits of old gasket or sealant from getting in where the valves are. Following the instructions I found in a Youtube video, I affixed the new gasket to the valve cover with Permatex and let it set up overnight.


One of the frustrations I had at this time were the conflicting suggestions about adjusting the valve clearances while I had the cover off. I read every source of info I could find on the subject and while many people said that it was easy to do, I still didn’t feel comfortable doing it myself. And as I noted earlier, it was carnival, and no one was around to help. For once, I actually followed my mantra of “if it ain’t broke, don’t screw with it,” and decided to leave the valves alone and reassemble the parts without worrying about it.
If it ain’t broke, don’t screw with it!
With instructions to not over tighten the valve cover, I gingery snugged it down. Unfortunately, after adding a bit of oil, my leak resumed. I cleaned off the oil and then, a bit at a time, tightened the four bolts holding the valve cover on some more. Eventually, the oil leak stopped. After filling the engine with oil, and changing the filter (not in that order) we ran it to test for leaks. After a couple of hours of operation, it looks like the new gasket might have done the trick.
Happy? Yes, but that was not the only repair we had to make.
Taking advantage of our time on the dock, we disconnected our anchor and dragged all of our chain out onto the dock (we were multi-tasking at this point — the engine was still running). Our intention was to inspect the chain and mark it in some way at suitable intervals. Unfortunately, we thought that when we purchased the boat, the 80m of chain that was advertised was all one length. After we anchored a couple of times though, we noted an especially shiny link at around the 150′ mark. What we suspected and confirmed yesterday was that we in fact had two lengths of 10mm chain connected by a joining link. That did not impress either of us.
Short of buying new chain, which we may very well still do, there’s not much we can do about it. The joining link looks OK but I still tried to add a bit of redundancy to the joint by adding in a length of Amsteel between the links, just in case. Crazy and unnecessary? Likely, but I don’t think it can hurt.
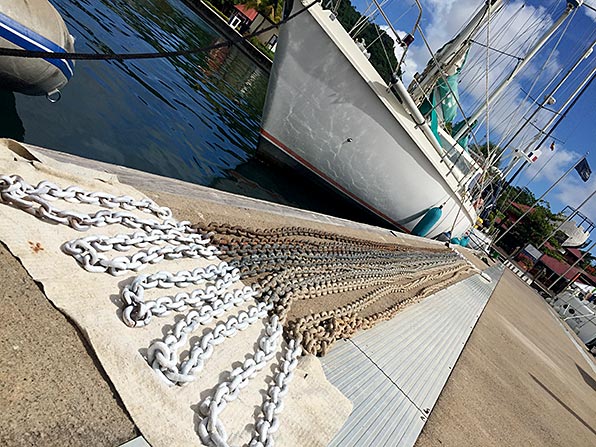
While historically we have marked our chain with colored tie wraps, the store we visited yesterday didn’t have any on hand. They did have spray paint though, so we purchased a can and used it to mark the chain every 25 feet. For the last few weeks we have been trying to convert to using meters instead of feet but we gave up and reverted back to the method that we’re most accustomed to. I know, very un-Canadian of us. When it’s time to drop the hook though, I don’t want to be bothered trying to do extra math to calculate scope.
In addition to the chain job, when I inspected the engine the other day, I noted a chafed raw water hose just after the strainer. While not leaking yet, it was begging to be replaced. As tough as that job turned out to be, I’m extremely happy that we did it while sitting on a calm dock instead of trying to make the repair at sea!
The hose just happened to be connected to fittings in the least accessible locations possible. Additionally, the hose, when cold, was just a bit too small to go overtop of the fittings. Getting the new hose onto those fittings was not pretty. Yes, there was some swearing going on!
The only people I know who voluntarily spend hours in a sauna are fighters trying to cut weight. While not my intention, working beside that hot engine for all that time was surely the equivalent. Even with all the water I drank, I bet I sweated off 5 pounds, or more. Not fun! I managed to get the hose on, secured by opposing double hose clamps at each end, right about five o’clock, just in time for happy hour. Nope, no happy hour for us. Rebecca and I, after the carnival madness, have decided to, at least for a week, take another break from drinking. My liver is very happy with that decision.
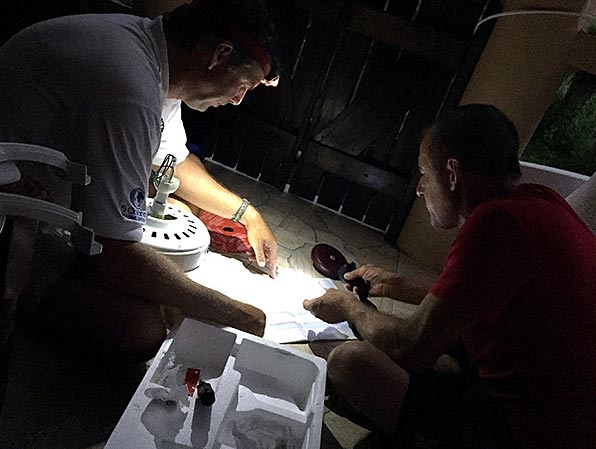
While I would have been happy to just crawl into bed at that point, I had promised our friends Chris and Chrystal that we’d go help them connect their new ceiling fan at their house. As they were just getting ready to leave their office at Port Louis, I collected my tools and we made our way over to meet up with them. Chris has been off island for a bit teaching sailing lessons so we had a fun visit while we worked in the dark to get the thing assembled and wired up. Were we successful? You bet, and while not without its own set of challenges, the job was a lot easier than wrestling with that hose. Man, I hate working with reinforced hoses more than any other boat job!
I’ve gotten stiff hoses to fit by setting the ends in boiling water for a time. It seems the stiffer the hose, the tighter the space to work in.
We did do that although it’s in no way convenient.
My 110V heat gun, recently given to a friend, has now been replaced with a nice 220V one for our next project.
Glad to hear the video helped, and great idea on tightening! I suspect the loop may have caused the eventual crack? But that is what the clothes pins are for.
Yes, it was nicely secured when the time came to install the cover. Thanks!
You might already know this, and I don’t intend to be pedantic, but I hope to be helpful…
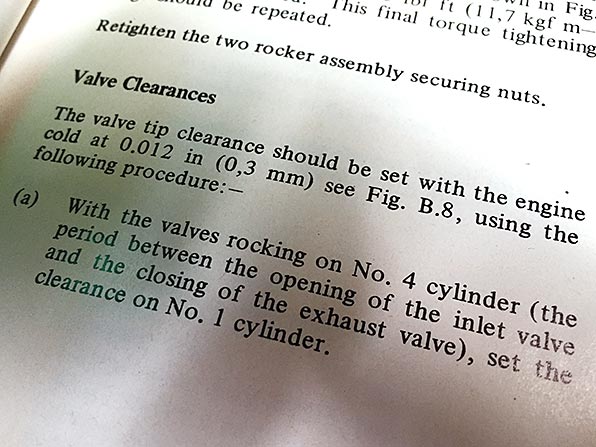
I’m not sure if you had the feeler gauges to do the valves anyways. Your photo of the manual gives a single value of 0.012″ or 0.3mm, so that part’s the easy part.
Here’s another potentially conflicting bit of instruction on how to adjust valves.
To adjust the valves, rotate the engine to TDC on each cylinder independently (I can see instruction (a) in your book, and it’s probably telling you how to get to TDC on cylinder 1), then check the clearances. If necessary, adjust the valve clearance between the top of the valve and the underside of the rocker arm. If adjustment is needed, you will find that the 0.012″ / 0.3mm feeler either doesn’t fit, or the feeler moves easily around in-between the rocker and the valve. First, put a screwdriver in the screw slot on the other side and loosen the nut. Adjust the screw until the feeler fits tightly, but you can easily slide it in and out. While holding the screwdriver, re-tighten the nut. There may be a torque spec, but it’s often difficult to torque these nuts without a special tool because you don’t want the screw to move while turning the nut. Perhaps a better option, if there is a torgue spec and if you have a torque wrench, is to get a feel by tightening another nut to the same torque (use a nut with a torque spec that is the same or higher) and feel how tight it needs to be. A third, shade-tree mechanic option is to tighten until snug and then tighten another quarter-turn.
Looking at the screws, I’d guess that your valves have been adjusted before. On most engines, once the valves seat themselves, they don’t recede much further.
Previously, I mentioned a crankcase breather. I noted the air breather on the top of the valve cover in your photos. It seems to me that it should handle blow-by fairly well. There are a few reasons why that might not be the case, but they would involve either improper assembly or flogging the engine. I assume that the hoses and pipe connecting the breather and the intake (pictured in the photo from Aug 8 are in good condition. They will help to keep your engine room clean by directing blow-by into the engine’s air-intake where it will be consumed by the engine.
One other possible contributor to oil leaks is if the engine room gets depressurized during full-power operation. Your diesel engine pumps its displacement in air every 2 revolutions. If it’s a 2 liter engine, then it pumps 1 liter of air every revolution. If it’s a 2 liter engine turning at 2500 rpm, then it’s pumping 5000 liters of air per minute. If your engine room won’t admit that amount of air, then it will depressurize and result in a greater air pressure difference between the oil drain channels inside of the engine and the outside of the engine (inside of the engine room). This will rob power, increase soot and fuel consumption, and aggravate any potential oil leaks.
You can detect this condition using a handheld vacuum/pressure gauge and inserting the hose into engine room air intake while the engine is running at full power and the hatches are closed. If the gauge registers a vacuum inside the engine room, then you might want to look at options to increase airflow or assign your cruising speed to be whichever engine speed results in minimal engine room vacuum.
Doesn’t everyone have a handheld vacuum/pressure gauge? Sorry, but I have no idea what that is.
I have read countless explanations on how to adjust the valve clearances. IMO, it is a job for a trained mechanic, not for a layman like me. At least not without some hands-on instruction BY a trained mechanic.
Good point.
In the absence of a hand-held vacuum gauge, you could use a length of clear tubing and a glass of water as a manometer. If one end of the tubing is snaked into the engine room and the other end inserted into the water, any vacuum in the engine room would draw water up the tubing out of the glass. Significant vacuum would suck the water out of the glass just like using a straw.
It’s good to know that the boat has an engine room intake fan as well as an exhaust fan. This can only help. From what I understand, most diesels are more efficient when air is force-fed (thus, the prevalence of turbo-diesels). I imagine that your inlet fan isn’t going to pressurize the engine compartment, but it should help to prevent a vacuum.
Very interesting.
Chain joining link
I had a joining link on my chain for 14 years, anchored many times in 30-40 knot winds with 11-ton Corbin 39 (what can I say, I like to anchor in Sagres, Portugal, way windier and Lake Erie).
The link was in the first 20 m of chain, but it was one size larger than the chain and had no problem going through the manual windlass.
The only reason I don’t have the link any more is because I lost my chain and 25 kg Rocna in a crazy chain of events (excuse the pun) last year. My links (good thing I bought a spare one, a you will see) was bought in Canada and top quality. Consider increasing the link to a size larger than the chain.
I also have a joining link on my present chain…you guessed it, another crazy chain of events – this time related to inept chandlery salespeople in Lisbon…and the boat is anchored in Culatra unattended for a while.
Horatio
Nice to hear your positive experiences.
Wow – that was one hellva day ‘in the bilges’ so to speak. Like you said, at least you weren’t rocking around out on the anchor. Congratulations on curing the leak!
I found that painting the chain is very effective. My method was to paint bands about 3 inches in width every 25 feet, but increase the number of bands. I only had 150 of chain so the at the 125 foot mark it was showing five bands. This way it was always easy to keep up with the amount of rode in the water.
If something like this makes sense to you, perhaps you could add some red stripes to ‘code’ what you’ve already painted?
Rebecca LOVES the new paint marks. We hope they last a while.