Nearing the final chapter
It’s been kinda quiet around here, at least when it comes to the ongoing windlass-installation saga. I am happy to report that the deck and the windlass are now “going steady.” The pics can tell the story better than words can…
A shiny, stainless steel hausepipe cover once lived here. With a LOT of coaxing it was removed and holes were drilled for the windlass bolts using the supplied template. The foam core was then hollowed out and the space filled with West Systems Six10 epoxy. The little notch to the side of the larger hole is where the wires will run.

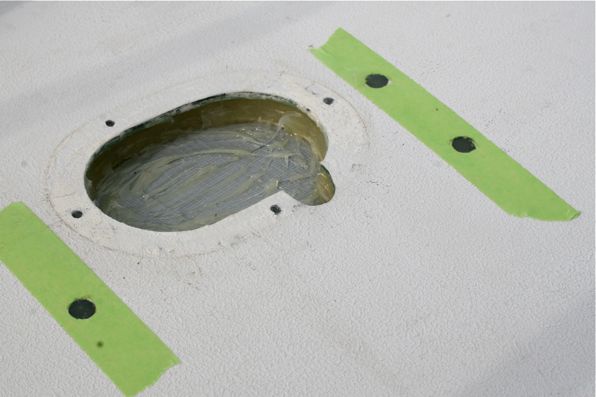
As I’ve written about MANY times before, the deck where the windlass needed to sit was not flat. I cut a hard plastic piece the same shape as the windlass base (I used a dollar-store cutting board), taped all around the outside (using 233+ green tape was recommended) and filled the space underneath the cutting board with epoxy thickened with 403. The BLOB to one side of the hole was to fill in a space that would not be covered by the windlass (remember that we reused the hole that was there. If we had cut a new hole it would have been a different shape and we wouldn’t have had this to deal with).

Installation rods threaded into the shiny windlass. I have 100′ of chain and 200′ of line flaked out on the tramp. I didn’t want to be dropping epoxy or adhesive down onto our anchor rode.

After debating on a variety of materials for a backing plate, I settled on StarBoard.

All put together. The windlass, and the backing plate, were both sealed with 3M 4000 UV.
Does it work? Yes, it runs. That is all I can say at the moment. Because I was missing a thing or two, I couldn’t complete the installation of the switches yesterday. I did rig up a temporary switch to confirm that it functions before I put my tools away though.
Once this job is completed we’ll be doing nothing more than enjoying the sunshine for the rest of the weekend!

Haven’t visited ya’ll in a while. Glad everything is going well. Wish we were relaxing this weekend. We’ll be painting our sailboat hull. Wish us luck, as we’ve never done this before!
Question for you Mike:
You mention near the second pic that you used a cutting board as the base to level out the deck to mount the windlass. However, the angle of the photo makes it hard to see the thickness of the board. Did you simply try to apply even pressure so that the cutting board stayed level or was it thick enough that it made good contact all around with the epoxy and pushed any excess out?
Thanks for posting your projects!
Sincerely,
Brad
Hi Brad
I knew that wasn’t a very good description I made!
The cutting board was to make a level surface, and as I said, it was cut exactly to the shape of the windlass base (the part which would touch the deck). This was easy to do as Lewmar supplied a gasket (that I opted not to use) so I just traced it. I then taped all around the deck where I DIDN’T want the epoxy to go. I first spread on some unthickened epoxy, then quickly mixed in some 403 until it was about peanut butter consistency, and then spread that in the area I wanted it to go. Using the bolt holes for alignment, I then put the cutting board piece on top of the epoxy and pressed it down. The little bit that squeezed out I scraped away.
Now, to be honest, this took two applications. The first one left some voids. Also, I waxed the bottom of the plastic piece and sprayed Pam on it so that it wouldn’t stick. I sat there having a beer (tough job, I know) while it dried and intermittently moved the bolts up and down. When I thought that it was going to stick to the plastic piece I also moved it a bit.
Without the windlass on it the “pad” was plenty ugly. It did fill in the small spaces that would have been present if I had not down it, and I think because of that the installation will be much stronger.
Thanks Mike. That’s kind what i figured but I have a similar project coming up and better to learn from others first, eh? Besides, only those of us that do this stuff ourselves actually care. The over-whelming majority seem to be of the “as long as it’s pretty on the outside” persuasion…
You’re welcome Brad. The next job I do with epoxy will probably look a little prettier. 🙂
It looks great!
Thanks Livia.
For a guy who claims not to be handy, you do nice work! For next time, here’s a trick with learned. Wax the bolts, the epoxy won’t stick to it.
Fair Winds,
Mike
Hey Mike
Thank you.
I am improving on the handiness scale. I am up to a 2.3 out of ten. 🙂
I actually coated the bolts with grease prior to putting them in but I was still concerned so I erred on the side of caution and kept moving them.
The installation looks very nice! Keep an eye on the StarBoard, though. I have found that most adhesives do not bond to it well, including 5200.
Will do. The adhesive shouldn’t have much to do with the structure of the install so hopefully that won’t matter much (knock on wood).
Nicely done Mike.
You seem to think things thru and come up with a good solution for everything you tackle.
bob
Thanks Bob. I am a much better “idea guy” though than I am a “make-it-reality guy.” 🙂