A heady job!
Yesterday was an extremely busy day with several jobs planned. In fact, we ended up working non-stop from our first cup of coffee until sunset.
Timing our departure to dodge an early-morning squall, Rebecca and I began the day by raising anchor just after 7:00 AM, moving the boat to dock over at Spice Island Marine. While we had tradespeople on the boat doing some work for us (fodder for tomorrow’s post perhaps), we tackled the chore of changing out the toilet plumbing in our aft head. This is never a fun job!

Just as we started making motions to raise anchor, we got a bit of a shower.

Of course, with showers come beautiful rainbows. That has to be a good omen, right?
Within days of arriving in Grenada with the new boat, we replaced the toilet and hoses in the forward head. We would have done the same with the aft head but at the time, there was only one of the toilets that we wanted on the island, and we wanted the one that we could purchase to be installed in the forward head for our soon-to-arrive guests. Now with some time, and all of the parts we needed (or so we thought), we were ready to tackle the aft head. This one had an added challenge though… we needed to change the head discharge seacock!
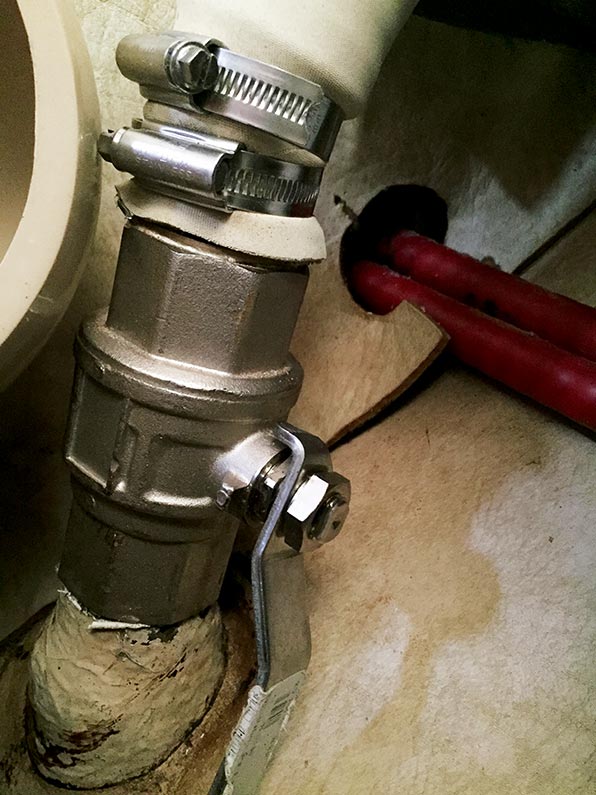
It was obvious just from comparing the two seacocks that the one in the forward head had already been swapped while the aft one looked to be original (32 years old?). I was pretty convinced that the older of the two was not working, and my suspicions would later be proven correct.

This looks to be original.

Looking down through the valve you can see that it is stuck in the half-closed position.
Moving the handle has no affect on this.
The first point of concern: where was the through-hull / valve located with respect to the water line? If the valve was removed, would water enter the boat? I was pretty sure just by looking at it that while the actual hole in the hull was below the water line (just), the valve itself was above it. In spite of that, I still stuck a wooden bung in the hole from outside the boat, just in case.
Note: We were tied up to the outside of the haul out bay so if something crazy happened and the boat started to sink, I could always run over to the boat yard and ask them to do an emergency haul out. 🙂
Removing the old toilet and hoses was a bit of a PITA but getting the old seacock off was a full-on battle! Alternating heat from our new heat gun, tapping with a hammer, and applying force from my pipe wrench didn’t seem to budge it. It was only when I put a piece of pipe on the wrench’s handle to increase my leverage that I was able to get it to move. Victory is sweet, but the job was only half done.

Adding the piece of pipe to the end of the wrench increased my leverage.

I was happy to see that once the valve was removed, the threads cleaned up nicely.
The installation of the new hoses, unfortunately, turned out to be an even bigger fight! Thick hoses are never a pleasure to deal with but I made the mistake(?) of purchasing some deluxe, super-duty hose from our friends, and it was a beast to deal with!
New seacock installed. Woo hoo!

And shiny new toilet. How sexy!
Ultimately we got it all together and working, but not until after the sun had set. And it only took 4 trips to Budget Marine to make that happen. Good thing they are located right next door to Spice Island, where we were docked. Perhaps the most frustrating part of a job like this is doing a task without the proper tools. I needed to cut a little bit of the interior shelving away to make room for the thicker hoses, and the perfect tool for that job would have been a Fein MultiMaster. If I’m a good boy, maybe Santa will bring me one this year.

A pile of tools, clamps, etc. that were used in the job, or removed from the old installation.
Note that the power tools had already been put away!

Well done. Not fun. Applying in the necessary force, in a controlled way, in what is always a highly restricted area is extremely difficult.
What made me smile though was your last picture. I don’t think I have ever seen the whole collection of bits and tools assembled before. It certainly illustrates what is involved rather nicely!
🙂
Mike
I was just too tired to put it all away last night so I just through everything into a corner. It has since been cleaned up.
Wow. You took all the precautions… but applying that much torque would have made me blanch, fearing that I’d loosen the thru-hull from the hull. if that happened the wooden plug wouldn’t do much, but a piece of saran wrap smoothed over the whole thing on the outside would slow the flow…
And we replaced our heads with the same Jabsco ones you chose a couple of years ago – we love them! So simple to lube when the time comes!
bob
s/v Eolian
Anacortes
Yes, it was concerning. I asked one of the pros at the boat yard what to do and he said that if we hired him, he would just put a big wrench on it. He did want me to haul the boat though, and was the one who insisted that I put a bung in the hole.
Everyone has an opinion on marine toilets. Respectfully, here’s ours:
http://www.lifeonthehook.com/2015/10/20/taking-care-of-business-or-just-say-no-to-jabsco/
Rhonda & Rhonda
S/V Eagle Too
Pensacola, FL
http://www.LifeOnTheHook.com
No question, there are better options than the Jabsco! They are cheap though (relatively), and sold everywhere, so parts should be available.
Umm, Mike – are you SURE that the threaded pipe you left in place is stainless? It looks like bronze from the photo. If so, you’re headed for trouble attaching a stainless valve to a bronze pipe. Also, I wouldn’t have referred to that unit as a proper seacock. In my experience, seacocks have a flange outside and inside. The inside flange should bolt to the outside flange. With a proper “seacock”, I don’t think you’d be able to remove the valve from the pipe. By the way, that pipe looks like its glassed in place and when you put that pipe wrench on the valve and turned it counter-clockwise, that must have put some torque on the outside flange …..but then it wouldn’t move much as it appears to be in a recessed cavity.
You’re right, it is a ball valve, not a true seacock.
And you’re also right in that I may have mixed my metals. How bad of a deal is that?
Its a bad deal Mike. I do recommend that you do NOT attach SS to bronze, if yes, then only for two months at the most. The valve won’t suffer, but the bronze pipe will. I do recommend that you change that valve out for a bronze one (if indeed I’m right and the threads are bronze) soonest and at your next haul-out, have a look at the bedding compound surrounding the bronze nipple. There is a rectangular fitting on the other side, maybe with a screen of some kind and I’m concerned that you might have broken the seal with that monstrous pipe wrench and those “Popeye” biceps of yours. 🙂
Roger. Thank you.
Trident 101? Very durable, but big and beastly.
I did a lot of long term testing of hoses for Practical Sailor. The sure winner for durability and terrific ease of use is Rairitan Saniflex. It is literally twice as flexible as anything else (4x Trident). I actually have 5 different hoses in my system now!
I know it’s too late for you, but perhaps other readers will benefit.
“I know it’s too late for you, but perhaps other readers will benefit.”
Reason enough to post. Thanks.
Catching up on your blog…
I’m glad that what happened to me didn’t happen to you.
The livewell ball valve on my center console fishing skiff was similarly stuck in 1/4 open position and my livewell pump died. Trying to remove the pump, I broke it off in the ball valve. Like yours, it’s not a seacock, but just a ball valve mounted to the thru-hull. Well, I needed to replace the ball valve anyways, didn’t I?
I don’t have a heat gun, and I’m not going to use a torch in my tiny bilge.
One big socket, extension, and breakover bar later, I had rotated the thru-hull and broken the seal to the hull of my boat. The ball-valve was still stuck. Good thing my boat was on its trailer in my garage.
Maybe I should have gotten a heat gun…
I wound up buying a sacrificial socket that would fit inside the through-hull and cutting a slice across it so it would interface with the tangs inside my thru-hull. Then I use the breakover bar on the inside of the boat and an impact wrench on the newly modified socket to break the thru-hull free from the ball valve.
It’s all cleaned up, re-mounted, and installed with a new livewell pump and a few other wiring corrections. My bilge pump float switch was connected with a wirenut instead of shrinkwrap-sealing crimp connectors)and the wire had broken off. I had no automatic bilge pump.
I’ve tested out the thru-hull and ball valve several times. Now I get to test the new plumbing and float switch the next time I go out.
Anyways, I’m really glad that what happened to me didn’t happen to you. If your through-hull had rotated in the hull the way mine did, you would have needed a haul-out soon.
– Dave
Yeah, breaking the through hull loose would have sucked. As you probably saw, we were tied up to the haulout bay when I was working on it. And the valve was above the waterline. The risk was minimal.